In six years at a record store in Chicago, the most common thing I saw ruin a collection was not a cheap turntable. It was people who never cleaned their records. Most of them had no idea they needed to. This guide covers every method from a $15 daily brush routine to deep cleaning records that have spent twenty years in a damp garage, and exactly which products to use for each.
How to Clean a Vinyl Record: Step-by-Step
This is the complete process. Steps 1 and 2 apply before every play. Steps 3 through 6 are the wet clean, done monthly for records you play regularly and before the first play of any second-hand or new record.
- Hold the record by its edges only. Never touch the playing surface. Skin oils transfer instantly and attract dust.
- Brush with a carbon fiber anti-static brush before every play. Place the brush lightly against the spinning record, let it sit for two to three full rotations, then slowly draw it toward the outer edge and lift off. This removes loose surface dust and discharges static.
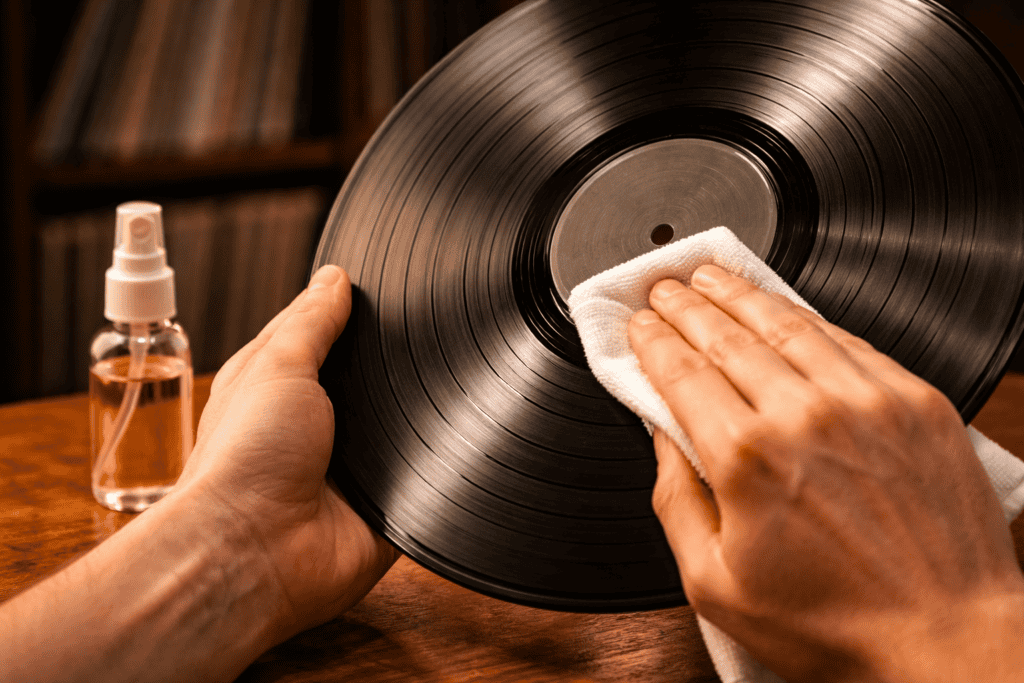
- Apply a small amount of record cleaning solution to a clean microfiber cloth. Never apply solution directly to the record. Use a purpose-made vinyl cleaning solution or distilled water only. Not tap water, not household cleaners.
- Wipe in a circular motion following the direction of the groove. Work from the centre outward, keeping pressure light and consistent. Never wipe across the grooves.
- Use a second dry microfiber cloth to remove all moisture. Wipe again in the same circular motion. The record should look completely dry when you are done.
- Air dry for at least one full minute before playing. Playing a wet record grinds remaining moisture and loosened debris into the groove. Do not skip this step.
What You Need
The complete manual kit costs around $55 and covers everything below. You do not need anything else to clean records well.
Why a Dirty Record Gets Worse Every Time You Play It
Playing a dirty record is not neutral. It is actively destructive. A vinyl groove is roughly 0.04mm wide. Your stylus sits inside that groove and traces its shape. When debris is in there, the stylus does not just pick up noise from it. It displaces the debris into the groove walls. Over repeated plays, what started as surface dust becomes microscopic scratches that permanently reduce high frequency detail, according to What Hi-Fi.
The damage is cumulative and silent. Your records will not sound obviously worse after one dirty play. They will just gradually stop sounding as good as they once did. By the time you notice, some of that damage cannot be undone.
I saw this firsthand. People would bring records into the store wondering why a pressing they had owned for twenty years sounded dull and crackly. The groove was packed with compacted debris. Some could be rescued with a thorough clean. Some could not. The difference was usually whether they had been played dirty for years or just neglected in storage.
A $15 brush and thirty seconds before every play prevents all of it.
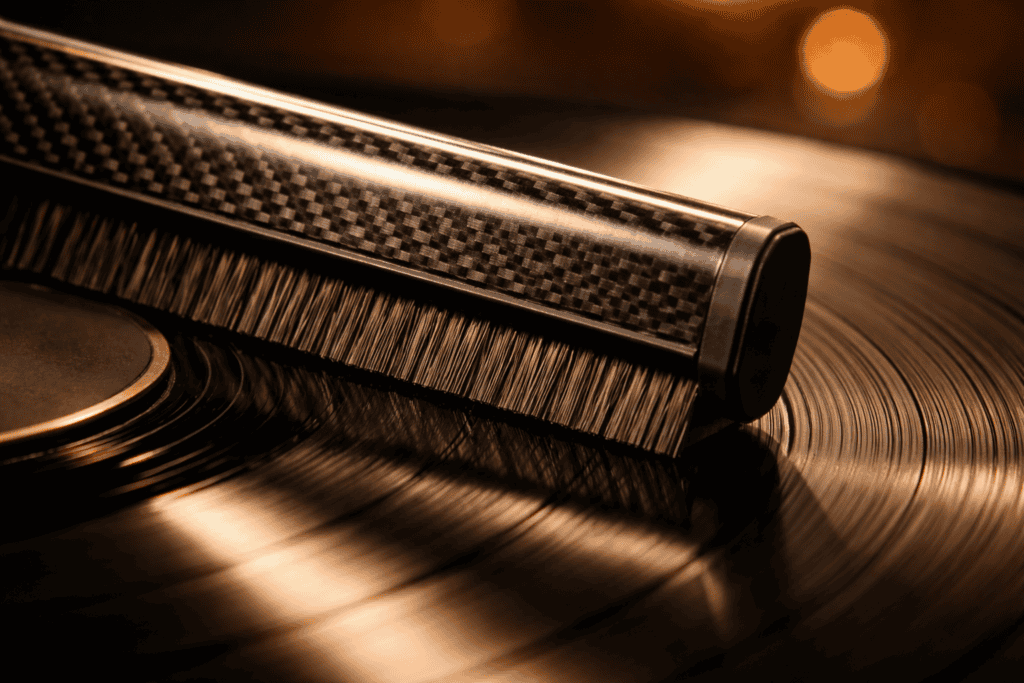
The Carbon Fiber Brush: Use It Every Single Time
This is not optional and it is not audiophile obsession. It is thirty seconds of maintenance that protects records you may have spent serious money on.
Place the brush lightly against the spinning record. The carbon fibers drop into the groove and lift dust out rather than pushing it around the surface. After two to three full rotations, slowly draw the brush toward the outer edge of the record and lift it off. The dust comes with it. That is the entire process.
Two things people get wrong consistently: pressing too hard and moving too fast. You are not scrubbing a pan. Light contact, slow drag to the edge, done.
The anti-static effect matters just as much as the physical cleaning. Vinyl builds up a static charge from friction, from the inner sleeve, from the stylus, from the air. Static attracts dust. A carbon fiber brush discharges that static and dramatically slows how quickly the record gets dirty again between plays.

Tonar Nostatic Carbon Fiber Record Brush
The AudioQuest Anti-Static Record Brush at around $20 is the step up: more conductive fibers and marginally better static discharge. The Tonar is perfectly good for most people. Either will last years if you do not press down on it.
Deep Cleaning: The Wet Method
A brush handles loose surface dust. It cannot touch the oils, fingerprints, and embedded grime that accumulate over time. For that you need a wet clean. This is the best way to clean vinyl records for anything beyond routine maintenance.
Apply a small amount of cleaning solution to a clean microfiber cloth rather than directly to the record. Wipe in a circular motion following the direction of the groove, working from centre outward. Use a second dry microfiber cloth to dry the record completely. Give it a full minute of air drying before you play it. Playing a wet record grinds any remaining moisture and loosened debris deeper into the groove. Do not skip the drying step.
One mistake I made early on: using the same microfiber cloth for multiple records without washing it. You end up dragging the grime from the first record onto the second. Keep two cloths per session and wash them with distilled water before the next use.
How often to wet clean depends on how you play. For records you play regularly, once a month is reasonable. For anything bought second-hand, clean it before the first play regardless of how it looks. New records are not exempt. Pressing residue from manufacturing is common enough that I clean every new record before its first play.

Mobile Fidelity Sound Lab Super Record Wash
The Best Record Cleaning Solutions
The vinyl record cleaning solution you choose matters more than most people realise. The right formulation lifts oils and debris out of the groove without leaving residue or damaging the vinyl compound. Here are the three worth buying.
All three use formulations designed specifically for vinyl. None contain high-concentration alcohol, fragrances, or surfactants that attract more dust after cleaning. If you only buy one, buy the MOFI. If you buy a lot of second-hand records, add the G3 enzyme fluid for problem records.
How to Clean Old or Heavily Soiled Records
Old records from a loft, a charity shop, or a damp garage are a different problem entirely. You can usually tell before you even play them. There is a grey haze across the surface rather than a clean black. The grooves have a white or off-white residue visible at an angle to the light. Sometimes there is visible mold. A dry brush will not touch any of this.
Start with a purpose-made cleaning solution on a microfiber cloth and wipe firmly but not hard, always following the groove in a circular motion. On genuinely filthy records, leave the solution on the surface for thirty seconds to a minute before wiping. This gives the surfactants time to penetrate the groove rather than just sitting on the surface.
Check your stylus after every side on a badly soiled record. You will see a small ball of grey or brown debris forming on the tip. If you keep playing without cleaning it off, you are dragging that loosened debris back into the grooves you just cleaned. Stop, clean the stylus from back to front with a stylus brush, then continue.
Repeat the wet clean two to three times if the first pass does not clear the noise. Most records respond. Some that look completely hopeless clean up remarkably well with a third pass. If a record still crackles heavily after four thorough wet cleans, the damage is likely physical scratches rather than dirt, and no amount of cleaning will fix that.
For records with visible mold, use an enzymatic cleaning fluid before anything else. Standard cleaning solutions do not break down mold effectively. GrooveWasher G3 is around $20 and works differently on organic contamination than standard solutions. The Analog Planet record cleaning archive is worth reading if you are tackling a large inherited collection.
Second-hand records stored horizontally in a stack often have a particular kind of embedded dust that does not respond to one wet clean. Be patient. The record probably sounds better than you think once it is properly clean.
How to Clean a Record Player Needle
A clean record played through a dirty stylus is still going to sound wrong. Debris accumulates on the stylus tip during every play. It builds up gradually, and unlike record cleaning, most people never do it at all.
Use a soft stylus cleaning brush and stroke from back to front only, in the direction of record travel. Never side to side. The cantilever that holds the stylus is fragile and lateral pressure can bend or snap it. This is not a theoretical risk. I have seen it happen. Back to front, light pressure, three or four strokes. That is the process.
For a deeper clean, a small amount of stylus cleaning fluid on the brush works well. It loosens compacted debris that a dry brush cannot shift. Clean the stylus every ten to fifteen plays at minimum, after every side of a heavily soiled record, and before you put on a record you have not played in months.

Mobile Fidelity Sound Lab Stylus Cleaner
If you are unsure which stylus you have or when it needs replacing, our best turntable cartridges guide covers the full replacement and upgrade path for every cartridge on the market.
What Not to Use on Vinyl Records
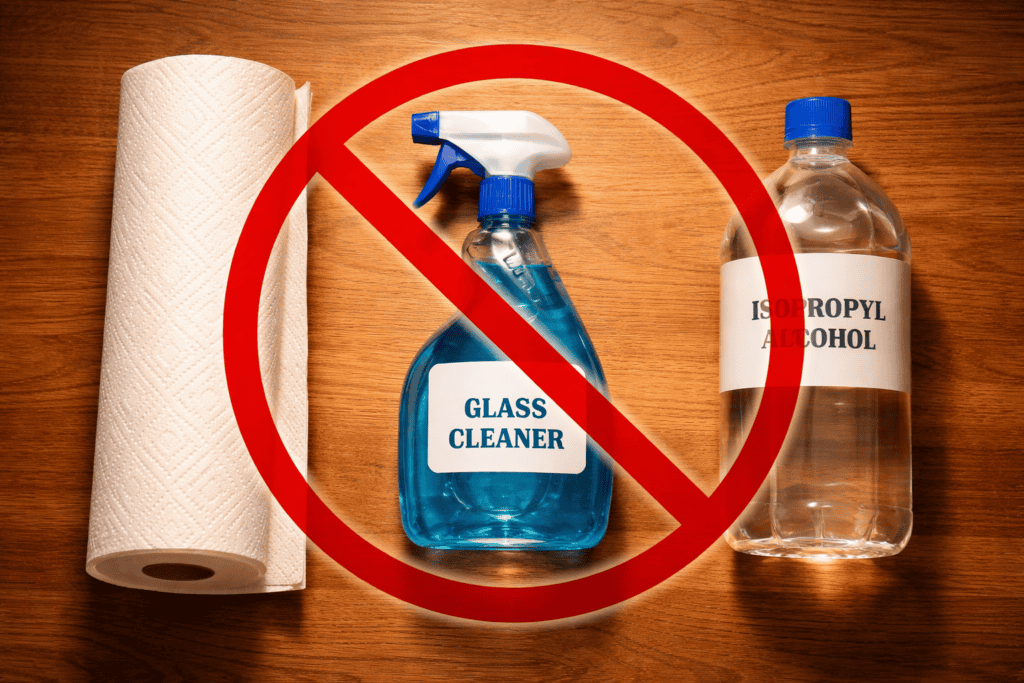
Tap water. The one I see recommended most often online. Tap water contains dissolved minerals. When the water evaporates, those minerals are deposited in the groove. You are trading one contamination problem for another. Distilled water costs $2 at any pharmacy. Use it.
Paper towels and tissues. The wood pulp fibers in paper are harder than the vinyl surface. Paper towels scratch records. Soft tissues are only marginally better. Microfiber only, always.
Household cleaning products. Glass cleaner, dish soap, and general surface sprays are not formulated for vinyl. They leave chemical residue in the groove, strip plasticizers from the vinyl compound over time, and many contain fragrances and surfactants that attract more dust after cleaning.
High concentration isopropyl alcohol. At the right concentration (around 20 to 25 percent diluted with distilled water) it is probably safe for occasional use. At higher concentrations it causes long-term damage to the vinyl compound. Most people do not measure carefully and err toward stronger. A purpose-made cleaning solution like MOFI costs around $30 and has the right ingredients in the right proportions. It is not worth getting the ratio wrong on a record you care about.
Do You Need a Record Cleaning Machine?
You probably do not. I will say that clearly because most articles on this subject are quietly trying to sell you something expensive.
A record cleaning machine uses vacuum suction or ultrasonic cavitation to pull cleaning solution through the groove and extract debris that a manual clean cannot reach. On a heavily soiled record the difference is real and immediately audible. If you are buying a lot of charity shop and car boot sale records, or if you have inherited a large collection that has never been properly cleaned, a machine will save significant time and do a more thorough job than hand cleaning.
Before committing to a full vacuum machine, the Spin-Clean MKII at around $80 is the step that makes sense first. It is a wet bath system: you rotate the record through a cleaning solution while two velvet brushes clean the groove simultaneously. For the price it is remarkably effective on records that have not responded to standard hand cleaning.

Spin-Clean Record Washer MKII Complete Kit
If you decide you need a proper vacuum machine, the Okki Nokki at around $300 is the entry point worth considering. But if you are buying new records and occasional second-hand purchases and cleaning them properly by hand before the first play, you will not feel the difference a machine makes. Spend $30 on the manual kit and use it every time without fail.
How to Store Records After Cleaning
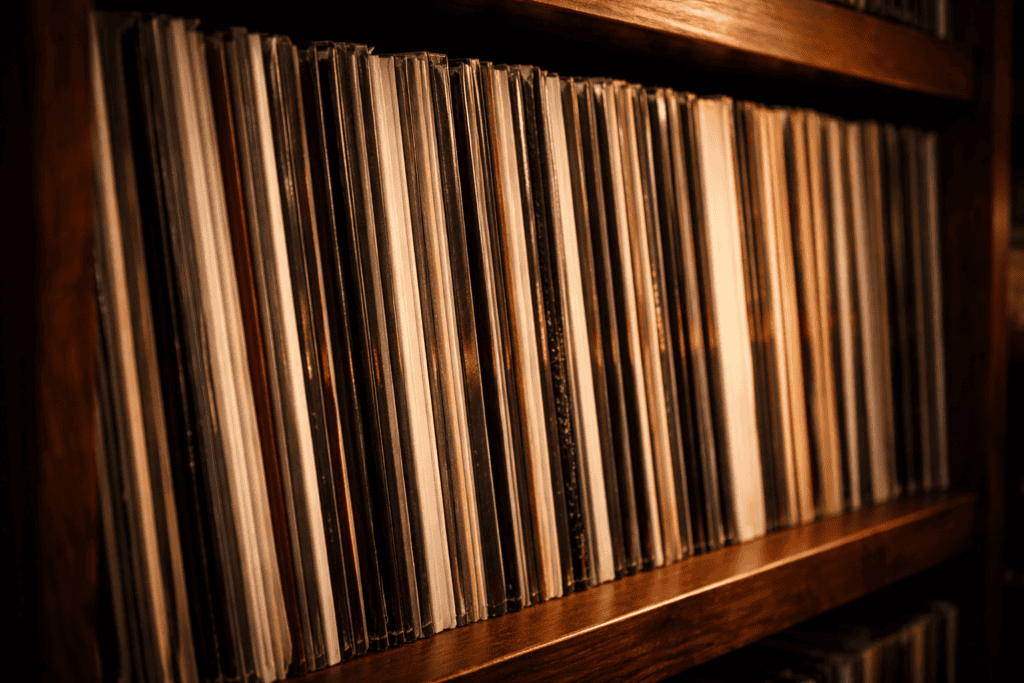
Cleaning a record and then storing it badly undoes the work almost immediately. A clean record stored in the wrong sleeve will pick up contamination all over again within days.
Replace paper inner sleeves with polyethylene inner sleeves. This is the cheapest upgrade in vinyl care and the most consistently overlooked. The paper sleeves that most records come with shed particles into the groove every time you insert or remove the record. Polyethylene sleeves are smooth, anti-static, and cost around 25 cents each. Buy a hundred and replace every paper sleeve you own. The improvement in background noise on records you play regularly is audible. Polypropylene and polyethylene are both safe. PVC inner sleeves are not: they off-gas and damage the groove over time.
Store vertically, always. Horizontal stacking causes warping as records press against each other and the weight of the stack deforms the vinyl over months. Store upright with enough lateral support that they stand straight rather than leaning at an angle.
Keep records away from sunlight and heat. Vinyl warps at relatively low temperatures. A record left near a radiator or on a south-facing windowsill on a warm afternoon can warp permanently. Store at room temperature in a stable environment away from heat sources.
Our best vinyl record sleeves guide covers exactly what to buy for inner and outer protection. Our best vinyl record storage guide covers shelving for every collection size.
Frequently Asked Questions
Only if it is distilled water. Tap water leaves mineral deposits in the groove as it evaporates. You are cleaning the surface but contaminating the groove at the same time. Distilled water is available at any pharmacy for about $2. For a genuinely good clean you also need a small amount of purpose-made vinyl record cleaning solution. The surfactants in it help lift oils out of the groove in a way that water alone cannot.
Carbon fiber brush before every single play, no exceptions. Wet clean once a month for records you play regularly. Before first play for anything second-hand, regardless of what it looks like. Before first play for new records too. Pressing residue from manufacturing is more common than most people think. In practice this adds about two minutes to a listening session.
Yes, and usually more than people expect. Surface noise drops noticeably. High frequency detail: cymbals, vocal sibilance, acoustic guitar strings: all come back. The background between notes gets quieter. I have handed people back records they thought were finished and watched them genuinely surprised at how good they sounded after a proper clean. It is the most cost-effective improvement in this entire hobby.
Use a soft stylus cleaning brush and stroke from back to front only, in the direction of record travel. Never side to side. The cantilever that holds the stylus is fragile and lateral pressure can snap it. For a deeper clean, use a small amount of stylus cleaning fluid on the brush. Clean the stylus every ten to fifteen plays at minimum, and after every side of a heavily soiled record.
Surface crackle and popping that was not there before. Dull or muffled high frequencies. Any visible dust or grey haze on the surface. Any second-hand record before first play. Any new record before first play. If you are asking the question, just clean it. Three minutes and there is no downside.
Carbon fiber brush before every play for routine maintenance. Wet clean with a purpose-made vinyl record cleaning solution on a microfiber cloth once a month or before first play of anything new or second-hand. Distilled water only. Never tap water, paper towels, or household cleaners. For a large collection of charity shop records or heavily soiled records, a Spin-Clean MKII wet bath system at $80 is the best value upgrade from hand cleaning.
No. Cleaning removes dirt, oils, fingerprints, and debris from the groove. It cannot repair physical damage to the groove walls. What it can do is make a scratched-sounding record sound significantly better if the noise was caused by embedded dirt rather than an actual scratch. Four thorough wet cleans will tell you which problem you have. If heavy crackle persists after four cleans, the groove is physically damaged.
James Calloway has been collecting vinyl for 22 years and spent six of them working at an independent record store in Chicago where he cleaned, graded, and sold thousands of second-hand records. He writes all vinyl care guides for VinylPickup.com.


James Calloway has been collecting vinyl for 22 years. He spent six of them behind the counter at an independent record store in Chicago, where he set up and evaluated turntable systems across every budget, talked customers out of gear that would disappoint them, and developed an opinion on what actually matters in a vinyl setup versus what just sounds good in a spec sheet. His listening runs toward jazz, classic rock, and well-recorded acoustic music. That bias shows up in his reviews and he flags it when it does. He writes all gear guides and record recommendations for VinylPickup.com. Every score, every pick, and every caveat reflects his own experience. No manufacturer sends him free products. No affiliate relationship changes what he says about anything. More about James and how VinylPickup works


